How the Kubernetes control plane works
Articles in this series
The Kubernetes control plane is the part of the cluster that accepts changes, stores the desired state, and decides what happens next.
When you create a Deployment, update a Service, or delete a Pod, you interact with the control plane instead of the worker nodes.
This layer manages the entire cluster, and it helps answer questions like:
- Is this request allowed?
- Where should this Pod run?
- Why are there only 2 Pods when the Deployment asked for 3?
- Which Pods should receive traffic for this Service?
While worker nodes run your containers, the control plane tracks the plan and works to keep the cluster aligned with it.
That is why Kubernetes feels declarative: you do not need to tell a node to start a specific container.
Instead, you set the desired state in the control plane, and the control plane handles the rest.
What are the control plane components?
At a high level, the Kubernetes control plane has four main parts:
- the API server, which is the front door to the cluster
- etcd, which stores the cluster state
- the scheduler, which picks a node for each Pod
- the controller manager, which runs loops to keep the actual state in line with the desired state

Each component has a specific job:
- The API server handles the request path: authentication, authorization, admission, and storage.
- etcd keeps a durable, strongly consistent record of cluster state.
- The controller manager runs the reconciliation loops behind Deployments, ReplicaSets, StatefulSets, etc.
- The scheduler focuses on one decision: where each unscheduled Pod should run.
In other words, the API server acts as the gateway, etcd stores the records, the controller manager moves objects toward the desired state, and the scheduler decides where to place them.
Suppose you run:
kubectl apply -f deployment.yamlThis command triggers a series of actions inside the control plane.
The API server is the entry point
Kubernetes does not save that Deployment directly to storage.
It first decides:
- Who you are.
- Whether you are allowed to do this.
- Whether the object should be modified before it is stored.
- Whether the final object is valid.

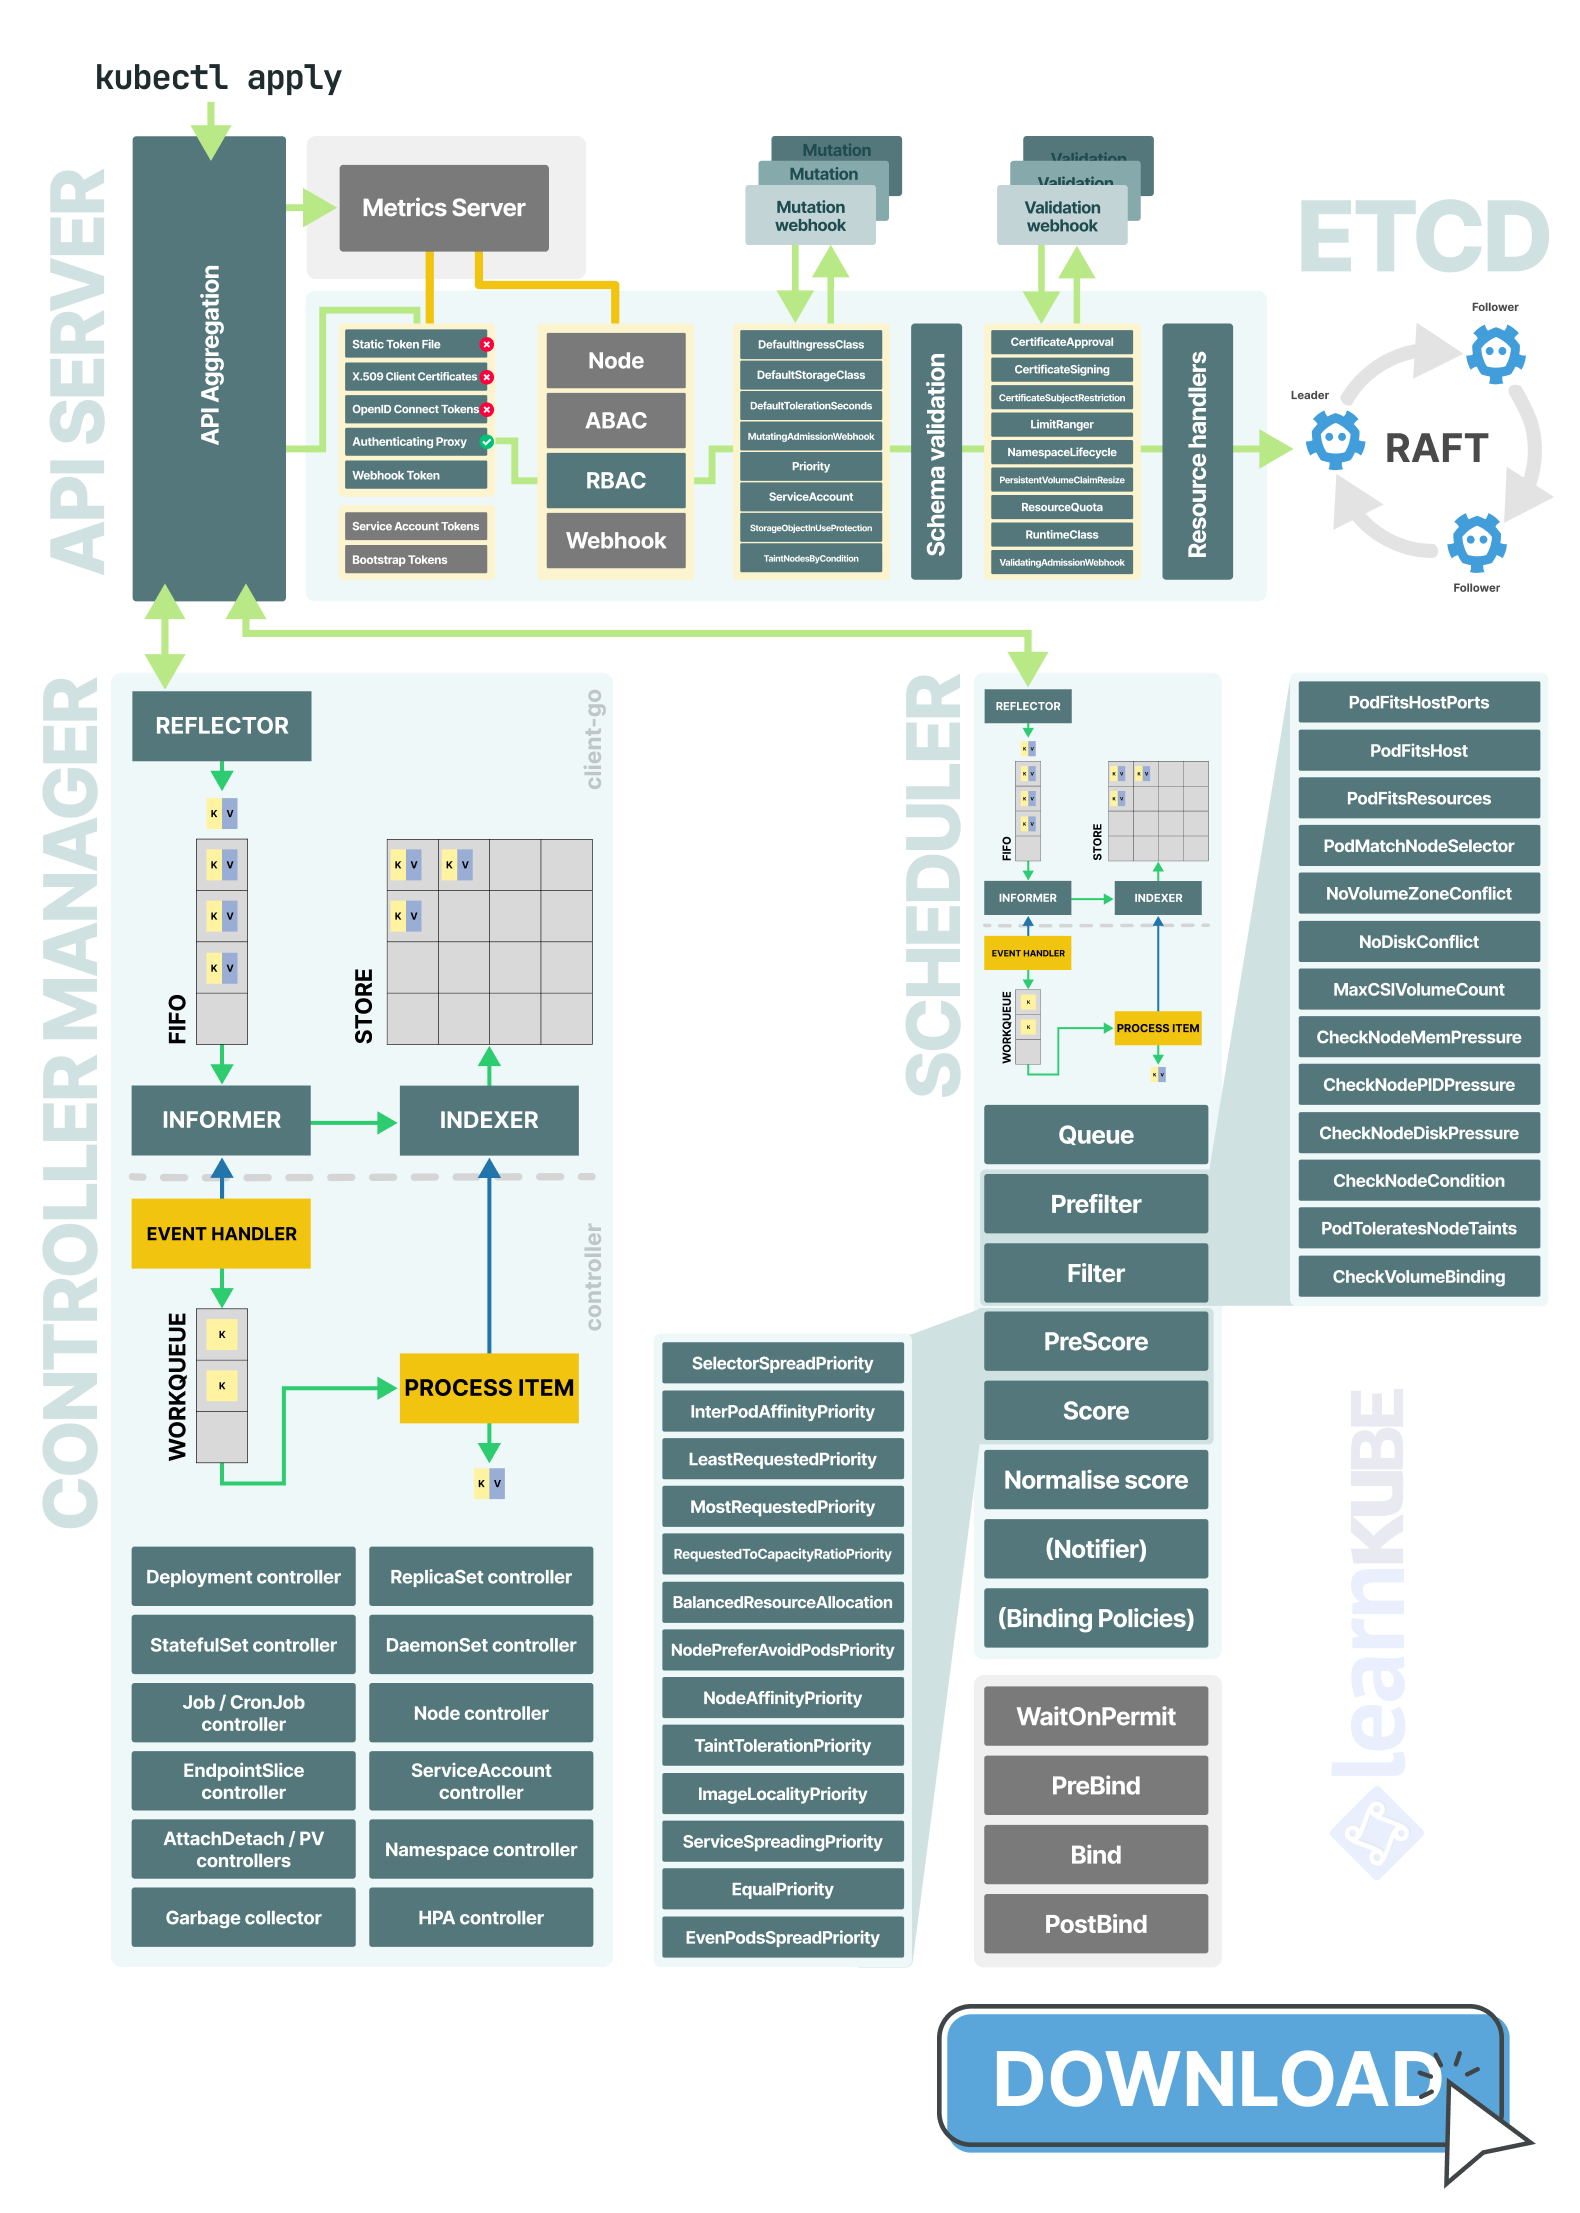
The API server checks the request for authentication, authorization, mutation, schema validation, and admission before storing it.
Only then does it hand the request to the relevant resource handler and persist it in etcd.
The API server also manages API aggregation, which lets some APIs, like Metrics Server, look native even if another component serves them.
This full request path (from authentication to admission to storage) is at the heart of the API server's job.
You can explore the API server in this article.
etcd stores the desired state
Once the API server accepts a change, it writes it to etcd.
Only the API server communicates directly with etcd: the scheduler and controller manager watch the API server instead of connecting to the database themselves.
etcd is a small, consistent key-value store built around Raft.
The leader accepts writes, replicates them to followers, and commits a new revision once a quorum agrees.

This design gives Kubernetes not only durability, but also ordered revisions and efficient change tracking.
That combination gives Kubernetes ordered updates and efficient change notifications because the control plane is built around etcd revisions and watches.
In large clusters, these strengths can have drawbacks: consensus is costly, the database uses a single bbolt file, every change creates a new revision, and the API server increases the load with its caches and watches.
That is also where etcd can become a scaling bottleneck.
You can explore how etcd works (inside and outside) Kubernetes in this article.
You can also explore how etcd (and API server) break at scale in this other article.
The controller manager turns intent into actions
After the Deployment is stored, the controller manager picks up the change.
At this point, Kubernetes shifts from just storing objects to acting as an automated system.
The controller manager runs many smaller control loops.

Each loop handles a specific part of the system: some create Pods, some respond to node or endpoint changes, some manage storage, and others clean up unused objects.
All these loops follow the same pattern: they observe the current state, compare it to the desired state, act to close the gap, and repeat the process.
You create a Deployment, and the Deployment controller creates a ReplicaSet.
The ReplicaSet controller sees that the ReplicaSet wants three Pods and currently has zero, so it creates three Pods.
Under the hood, controllers watch for changes, queue the affected object, and reconcile from the cache rather than reading etcd directly on every pass.
You can explore how the controller manager works in this article.
The scheduler turns Pods into placements
The scheduler also runs in a loop, but its role is more focused.
It looks for Pods without a node, removes nodes that cannot run them, ranks the remaining options, and then assigns the Pod to a chosen node.
In practice, scheduling mostly involves eliminating unsuitable nodes first, then ranking the rest.
This is why features like node affinity, taints and tolerations, topology spread constraints, and resource requests are important: they influence how the scheduler filters and ranks nodes.
You can learn about the scheduler in this article.
Read the control plane as a chain reaction
The simplest way to see how everything connects is to follow a Deployment as it moves through the control plane:
kubectl applysends a request to the API server.- The API server authenticates, authorizes, mutates, validates, and stores the Deployment in etcd.
- The Deployment controller notices the new Deployment and creates a ReplicaSet.
- The ReplicaSet controller notices the ReplicaSet and creates Pods.
- The scheduler notices the Pods without a node and assigns each one to a machine.
- The kubelet starts the containers.
- The EndpointSlice controller notices readiness changes and updates service routing.
By the time the Pod starts, the original Deployment has already gone through storage, reconciliation, and scheduling.